

1. Add applications or programs to the start menu and taskbar.
For ease of access and to minimize clutter on your desktop, it can be helpful to add commonly used programs to the start menu and task bar. In Windows 10, you can put shortcut icons on the start menu (they appear on the right hand side after clicking on Start on the bottom left on your desktop). Programs can also be added to the taskbar, the black strip at the bottom of your screen. The taskbar is a great place to place shortcuts for frequently used applications.
On the bottom left, click to the right of the Start Menu ![]() and begin typing the first few characters of the program that you would like to appear in the Start Menu (i.e. Word, Excel, PowerPoint).
and begin typing the first few characters of the program that you would like to appear in the Start Menu (i.e. Word, Excel, PowerPoint). 
- When the program you want to add is displayed, hover your mouse over the top of the displayed program, right click and select "Pin to Start." Added Start Menu items will appear as large icons on the right hand side when clicking on Start. You can also click on the Start Menu and scroll down through the list of applications to add to the Start Menu or type in the "Search Windows" field to add a program to the Start Menu.
2. Customize
A. Power Settings
Laptop and Desktop Suggested Settings:
Screen
- On battery power (Laptop): Turn off after 10 minutes.
- When plugged in (both Laptop and Desktop): Turn off in 1 hour.
Sleep
- On battery power (Laptop): Laptop goes to sleep in 1 hour.
- When plugged in: (both Laptop and Desktop) goes to sleep in 8 hours.
3. Surface Tips
A. Turn off WiFi While Asleep
By default, your Surface WiFi is continually connected to WiFi, even when asleep. This will drain your battery FAST. Below are instructions for how to turn off this default feature.
- Click the Start Menu
 (bottom left on the desktop) and type in “Power & Sleep Settings” (be sure to use the ampersand) and select it. That will open the Settings window.
 - Ensure Power & Sleep is displayed at the top (or selected on the left if window is wider).
- In the main pane (on the right hand side) scroll down to the Wi-Fi section and in that section turn off "On Battery Power, Stay Connected to Wi-Fi while Asleep." If you don’t have a Wi-Fi section, then this setting is not applicable to your laptop, and there is nothing for you to do.
- Close the window.
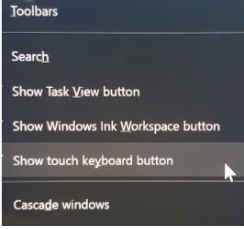
B. On Screen Keyboard Icon
For tablet devices such as a Surface, having the keyboard icon ![]() available in the system tray (on the bottom right near the clock) can be very convenient when you need to utilize the keyboard and the keyboard isn't automatically invoked when opening a program or application, such as Word or Excel.
available in the system tray (on the bottom right near the clock) can be very convenient when you need to utilize the keyboard and the keyboard isn't automatically invoked when opening a program or application, such as Word or Excel.
- Right click on the taskbar (the black bar at the bottom of the screen on the desktop) -> select "Show touch keyboard button."
C. Enabling Windows Hello
Rather than typing in your username and password to get access to your Surface (Surface Pro 4 or newer), with Windows Hello you can use other methods to sign-in like a fingerprint, iris, or facial recognition.
- To enable Windows, Select the Start button -> Settings -> Accounts -> Sign-in options
4. Notifications
Notifications in Windows 10 are intended to keep you informed of software updates and changes, tips for using Windows 10 more effectively, and changes to your computers that may effect you. By default, notifcations are turned on. If these notifcations are disruptive or you would like to make adjustments to the notifcations, here's how.
A. Windows 10
- At the desktop, on the bottom left, click on Start -> Settings -> Notifications & Actions (as an alternative, you can type in notifications in the "Search Windows" box to the right of the start menu on the bottom left). You will find Notifcations in the middle-center of the settings page. Turn on or off desired notifcations by using the lever/bar underneath each notification setting.
B. Outlook
- Open Outlook and go to File->Options->Mail->Message Arrival
For OWA (Cornell webmail), logon to Cornell webmail - (http://outlook.cornell.edu) -> click on the gear on the top right ![]() -> Mail (bottom right under "Your app settings") -> Message Options (under mail on the right hand side)
-> Mail (bottom right under "Your app settings") -> Message Options (under mail on the right hand side)
PLEASE NOTE: OWA (Cornell webmail) settings you'll only have to adjust the settings once. Outlook settings on a computer would need to be adjusted on each computer that has Outlook.
5. Set Program Defaults
Default programs set which program or application will automatically open. For example, you may want Mozilla Firefox to be your default web browser that opens when you click on a web link or Google to be your default search engine for web searches. Below are instructions on how to change program defaults.
A. Windows 10 Defaults
- On the bottom left, click to the right of the Start button
 (it will either say Search Windows or have a magnifying glass) and type "default programs." Select Default Programs (will appear above search). *Note* If using Windows Search does not produce results, you can find Default Programs by going to the Start Menu
  -> Settings -> System -> Default Apps. Underneath each default applicaton category, click on the pictured icon to change the default.
B. Internet Search Engine
-
Firefox
Open Firefox. At the top left, click on Tools -> Options -> Search (left hand side pane). Under Default Search Engine select your preferred seach engine. Once the appropriate selection has been made, close Firefox.
-
Internet Explorer
Open Internet Explorer. At the top left, click on Tools -> Options -> Programs -> Manage add-ons -> Search Providers -> Find more search providers (bottom left). Find the search providers you would like to add then select Add.
6. Set Background Image
Windows puts a default image for your background on the desktop. If you would like to change that image, here's how:
With all the programs and applications minimized or closed on the desktop, right mouse click and select Personalize from the pop up menu (last option on the bottom) -> Background. You can also get to Personalization by going to the Start menu ![]() on the bottom left, go to Settings -> Personalization -> Background. Under Background, select if you would like a picture displayed, just a solid color, or slide show of pictures. To have a slide show of pictures, copy the pictures you would like to appear in the slide show into the Pictures folder. Use the Browse button if you would like to have one picture for your background. Use the Choose to fit options to specify the presentation of the photos.
on the bottom left, go to Settings -> Personalization -> Background. Under Background, select if you would like a picture displayed, just a solid color, or slide show of pictures. To have a slide show of pictures, copy the pictures you would like to appear in the slide show into the Pictures folder. Use the Browse button if you would like to have one picture for your background. Use the Choose to fit options to specify the presentation of the photos.